A roof inspection report records a roof's condition on a specific date: what was inspected, how, what was found, where, how serious it is, and what should happen next. The best ones let a stranger verify every finding without climbing the roof again.
A roof inspection report is the only part of the inspection most people ever see. The homeowner, the property manager, the adjuster and the buyer's agent were not on the roof. They read the document, look at the photos, and make a decision worth thousands of dollars based on what you wrote.
That is why the format matters more than it seems. A report that says "some granule loss, recommend monitoring" with three blurry photos is not wrong. It is just useless the moment anyone questions it.
This guide covers what a roof inspection report should contain, section by section, with a template you can copy. It also covers the parts that change when the roof was captured by drone rather than on foot: the capture record, how measurements were derived, and an honest statement of what the aircraft could not see. If you are still setting up the service itself, start with our drone roof inspection business guide.
Table of contents
- What is a roof inspection report?
- Roof inspection report template: the sections in order
- The capture record: what drone reports need that ladder reports don't
- Measurements: state how you got the number
- Scope and limitations: what the drone did not see
- How to write findings that survive a second opinion
- Residential vs commercial roof reports
- Roof inspection reports for insurance claims
- Delivering and keeping the report
- Building roof reports in DroneBundle
- FAQ
What is a roof inspection report?
A roof inspection report is a dated, written record of a roof's condition, prepared by the person who inspected it, with photographs tied to each finding and recommendations ranked by urgency. It is used for maintenance planning, real estate transactions, insurance claims, warranty questions and repair quotes.
The same roof can need very different reports depending on who asked for it:
- Pre-purchase or pre-listing: a buyer wants remaining service life and any deal-breakers.
- Storm or claim: an adjuster wants damage that can be attributed to a specific event, and proof that it was not already there.
- Maintenance survey: a facility manager wants a prioritized repair list and a budget.
- Warranty or dispute: a manufacturer or lawyer wants workmanship and installation evidence.
Decide which of these you are writing before you fly. It changes what you capture, not just what you write.
Roof inspection report template: the sections in order
A complete roof inspection report has ten sections: header, summary, property and roof system, capture record, scope and limitations, measurements, findings, recommendations, photo appendix, and sign-off. The capture record, scope and measurement method matter most when the roof was flown rather than walked.
Here is the full structure. Copy it into whatever you use to build reports.
ROOF INSPECTION REPORT

1. HEADER
   Report ID and version | Inspection date and time window
   Client name and contact | Property address and parcel/building ID
   Inspecting company | Inspector name and credentials
   Purpose of inspection (maintenance / purchase / storm claim / warranty)

2. EXECUTIVE SUMMARY
   Overall condition rating | Estimated remaining service life (range)
   Top 3 findings by priority | Recommended next action

3. PROPERTY AND ROOF SYSTEM
   Building type and stories | Roof sections (label each: A, B, C...)
   Covering type per section | Approximate age and source of that age
   Slope/pitch per section | Drainage (gutters, drains, scuppers)
   Penetrations and rooftop equipment | Known repair or claim history

4. CAPTURE RECORD
   Method (drone, on-roof, ladder, interior, combination)
   Remote pilot and certificate number | Aircraft and camera/payload
   Flight altitude, overlap, ground sample distance
   Weather at capture (wind, temp, sky, precipitation in last 48 h)
   Number of original images | Flight log reference

5. SCOPE AND LIMITATIONS
   Areas inspected | Areas not inspected and why
   Tests performed / not performed (moisture, core, test squares)

6. MEASUREMENTS
   Per-section plan area, true surface area, pitch, squares
   Method and expected accuracy | Ground or tape checks performed

7. FINDINGS (one entry per finding)
   ID | Section and location | Category | Condition rating
   Description | Likely cause (if stated, hedged) | Priority
   Photo references (overview, context, close-up)

8. RECOMMENDATIONS
   Immediate (safety or active leak) | Within 12 months | Monitor
   Suggested re-inspection interval

9. PHOTO APPENDIX
   Numbered images with captions, mapped to finding IDs

10. SIGN-OFF
   Inspector signature and date | Report issue date
   Statement of independence / conflicts of interest
   Disclaimer and intended use
Sections 4, 5 and 6 are where a drone roof inspection report either earns trust or loses it. They get their own sections below.
The capture record: what drone reports need that ladder reports don't
A drone-based roof inspection report must document who flew, what aircraft and camera were used, and the conditions at capture, because the imagery is the evidence and the reader cannot assume it was collected by a qualified person in good conditions. When an inspector walks a roof, their presence is implied. When a remote pilot flies it, the reader has only the paperwork.
The fields that matter:
- Remote pilot in command and certificate number. Commercial roof flights in the US require a Part 107 certificate, and the FAA can ask to see it along with any records you are required to keep under 14 CFR 107.7. Put the number in the report. It costs nothing and it pre-empts the question.
- Aircraft and payload. Model and serial, plus camera. A 20 MP wide sensor and a 48 MP zoom produce different evidence, and a thermal payload changes what you can claim at all.
- Altitude, overlap and ground sample distance. GSD is the size of one pixel on the roof. If a hail strike is only a pixel or two across, you cannot reliably identify it, and the report should not imply you did.
- Weather at capture. Wind, temperature, sky cover, and rain in the prior 48 hours. Wet shingles photograph darker, frost hides granule loss, and low sun turns every shingle edge into a shadow that looks like a lift. Our guide to weather for professional drone operations covers what to log.
- Image count and flight log reference. "412 original images, flight log DJI_2026-09-18_1422" tells a reviewer that originals exist and can be produced. Keep the log itself with the job; the DJI log guide explains what the file contains.
If the job needed LAANC authorization or you flew over people under an operations-over-people category, note that too. It rarely comes up. When it does, you will want it written down.
Measurements: state how you got the number
Every measurement in a roof inspection report should say how it was derived and roughly how accurate it is, because an 8/12 roof has about 20% more surface than its footprint, and a 12/12 roof about 41% more. Report the footprint instead and the error flows straight into a material order or a claim.
The most common mistake is reporting plan area as roof area. A top-down orthomosaic shows the footprint of a roof, not its sloped surface. The true surface area is the plan area multiplied by a pitch factor:
| Pitch (rise/12) | Pitch factor | 2,000 sq ft footprint becomes | Squares |
|---|---|---|---|
| 4/12 | 1.054 | 2,108 sq ft | 21.1 |
| 6/12 | 1.118 | 2,236 sq ft | 22.4 |
| 8/12 | 1.202 | 2,404 sq ft | 24.0 |
| 10/12 | 1.302 | 2,604 sq ft | 26.0 |
| 12/12 | 1.414 | 2,828 sq ft | 28.3 |
A roofing square is 100 square feet. Report 20 squares on an 8/12 roof and the contractor comes up four squares short before waste is even added.
What to write in the measurements section:
- Per-section figures. Plan area, pitch, true surface area and squares for each labelled section, not one total.
- Method. "Measured from a photogrammetric 3D model built from 412 nadir and oblique images" is a method. "Drone measurement" is not. Our overview of photogrammetry software explains the difference between the outputs.
- Accuracy statement. Say whether you checked any dimension against a tape measurement or ground control points. If you did not, say the figures are suitable for estimating and should be field-verified before ordering materials.
- Excluded areas. Parapet walls, skylights, and equipment curbs are either in the area or out of it. State which.
Waste factor belongs to whoever is bidding the job. Leave it out of the inspection report, or label it clearly as an assumption.
Scope and limitations: what the drone did not see
A roof inspection report's scope section lists what was inspected, what was not, and which tests were or were not performed. It protects the reader from assuming the roof was checked for things it was not, and it protects the inspector when those things turn out to be wrong.
Drones are excellent at coverage and terrible at touch. Be specific about the gap:
- Hail functional damage. InterNACHI's guidance on hail test squares describes adjusters marking 100 square foot test areas on each slope and counting only hits that meet the definition of functional damage, and it notes that whether damage is functional is a common point of disagreement. Imagery can locate and pre-count likely hits. It cannot always show whether a hit is functional, so say whether anyone confirmed them on the roof.
- Soft decking. A spongy deck is found by walking on it. No camera finds it.
- Fastening and underlayment. Nail placement, missing starter strips and underlayment condition are invisible from above.
- Interior and attic. Staining, daylight through boards, ventilation and insulation. If you did not go inside, say so.
- Thermal moisture surveys. Infrared can indicate wet insulation under a low-slope membrane, and ASTM C1153, the practice for infrared roof moisture surveys (including aerial ones), covers verifying infrared data with invasive test methods such as cores. A thermal anomaly is a place to cut, not a conclusion. That practice is written for surveys at night, which brings in night operation rules under 14 CFR 107.29. Our thermal mapping guide covers the timing.
- Obstructed areas. Overhanging trees, solar arrays, and HVAC units hide what is beneath them.
One sentence per limitation is enough. "Decking condition was not assessed; no on-roof access" is clear, honest and hard to argue with.
How to write findings that survive a second opinion
A defensible finding has a location, a category, a condition rating, a plain-language description, a priority, and at least one photo that shows where it is and one that shows what it is. If a second inspector could not find the same spot from your report, the finding is incomplete.
Use a three-photo sequence
A close-up alone proves nothing about location. For each finding, include:
- Overview: the whole roof section, with the finding marked.
- Context: close enough to see neighbouring features (a vent, a valley, a chimney).
- Detail: the defect itself, sharp enough to read.
Drone imagery makes this easy because the same spot was usually captured from several angles. Pick the most direct view for the detail shot, not the most dramatic.
Rate condition and priority separately
Condition describes the thing. Priority describes what to do about it. A badly cracked pipe boot over a storage room and the same crack over a server room have the same condition and different priorities. A short condition scale (for example Good, Fair, Poor, Failed) and a three-tier priority (Immediate, Within 12 months, Monitor) are enough for most roofs. Whatever you pick, define it in the report so readers do not guess.
Describe, then hedge the cause
Write what you observed first. Attribute cause only if you are qualified to, and then with measured language: "Circular granule displacement consistent with hail impact" rather than "hail damage." The first is an observation. The second is a causation opinion that someone may later ask you to defend.
A sample finding entry:
| Field | Example |
|---|---|
| ID | F-07 |
| Location | Section B (south slope), 3 ft east of plumbing vent |
| Category | Flashing |
| Condition | Poor |
| Description | Pipe boot collar split on upslope side; exposed fastener heads adjacent, sealant weathered |
| Cause | Consistent with UV degradation of rubber collar; no impact marks observed |
| Priority | Within 12 months (Immediate if interior staining is present below) |
| Photos | P-031 (overview), P-032 (context), P-033 (detail) |
Keep repair costs out of the findings unless the client asked for them. If they did, put them in a separate estimate section so the inspection and the sales pitch are not the same document.
For team-wide consistency, the checks in our quality assurance guide for drone inspections apply directly to report review.
Residential vs commercial roof reports
Residential and commercial roof inspection reports share a structure but differ in what dominates them. Residential reports are driven by steep-slope coverings, storm events, and transactions. Commercial reports are driven by low-slope membranes, drainage, rooftop equipment, and multi-year capital planning.
| Area | Residential | Commercial |
|---|---|---|
| Typical covering | Asphalt shingle, tile, metal | TPO, EPDM, PVC, modified bitumen, BUR |
| Main failure points | Flashing, vents, valleys, hail, wind | Seams, ponding, drains, penetrations, parapets |
| Measurements | Squares per slope, pitch | Section areas, drain locations, ponding extents |
| Moisture work | Rare | Infrared survey plus cores is common |
| Primary reader | Homeowner, agent, adjuster | Facility manager, asset owner, capital planner |
| Repeat cadence | After storms, before sale | Annual or semi-annual, plus post-storm |
Commercial portfolios add one more requirement: the report has to be comparable with last year's. Label sections the same way every time, use the same condition scale, and fly the same pattern, so a reader can tell whether a ponding area grew or just looked different. That consistency is what makes a report series worth more than the sum of its reports. Legacy Technology Lab, which runs commercial roof inspection programs at scale, uses DroneBundle to keep documentation consistent across the more than 20,000 commercial roof inspections it expects to run in 2026.
Roof inspection reports for insurance claims
A roof inspection report used for an insurance claim needs to show that damage exists, where it is, how extensive it is, and that it plausibly matches the date of loss. Carriers and their adjusters decide coverage; your report supplies evidence they can rely on.
What makes a claim report more useful:
- Date and conditions of capture, as close to the loss event as practical.
- Per-slope documentation. Adjusters commonly use test squares on each slope, and the number of hits needed to replace a slope varies by insurer, according to the InterNACHI test square guidance. Organize findings by slope, report counts, and let the adjuster apply the threshold.
- Collateral indicators. Dents in gutters, downspouts, vents and soft metals help establish that an event occurred. Photograph them.
- Pre-existing conditions. If you have a prior report of the same roof, compare it. Wear that was already visible last year is not storm damage, and saying so builds credibility.
- Originals preserved. Keep unedited source images separate from annotated versions. Markups go in the report; originals stay available on request.
Be careful about the line between documenting damage and adjusting a claim. In Florida, for example, Florida Statutes section 626.854 treats anyone paid to prepare or file a claim for a policyholder, or to investigate or adjust one on their behalf, as a public adjuster. Its exception for people who photograph damage is limited to personal property, so do not assume it covers photographing a roof. Texas requires public adjusters to hold a TDI license. Rules differ by state, so check with your state's department of insurance before offering more than documentation. The insurance guide for commercial drone services covers your own liability cover for this kind of work.
This is general information, not legal advice. Confirm your services with your state's department of insurance or an attorney before you offer them.
Delivering and keeping the report
A roof inspection report should be delivered as a fixed, versioned PDF, with the underlying imagery and model available separately, and retained for at least as long as any warranty, claim or sale it might support. The PDF is the record. The data behind it is the evidence.
A few practices that prevent problems later:
- Version every reissue. If a client asks you to change wording, issue v2 with a change note. Never overwrite v1. Our post on document version control explains why.
- Share the model, not just the PDF, when it helps. Facility managers and adjusters often prefer to explore a 3D model or orthomosaic themselves. A client portal or share link lets them without emailing gigabytes.
- Export in formats others can use. Contractors and adjusters may want the imagery, point cloud or measurements in their own tools. Hand those over in standard formats, and keep the job record exportable too; project data export shows jobs, flights and team exported as PDF or Excel.
- Own your archive. Multi-year roof programs depend on being able to pull the 2024 report next to the 2027 one. Store it somewhere you control; data ownership covers the options.
Building roof reports in DroneBundle
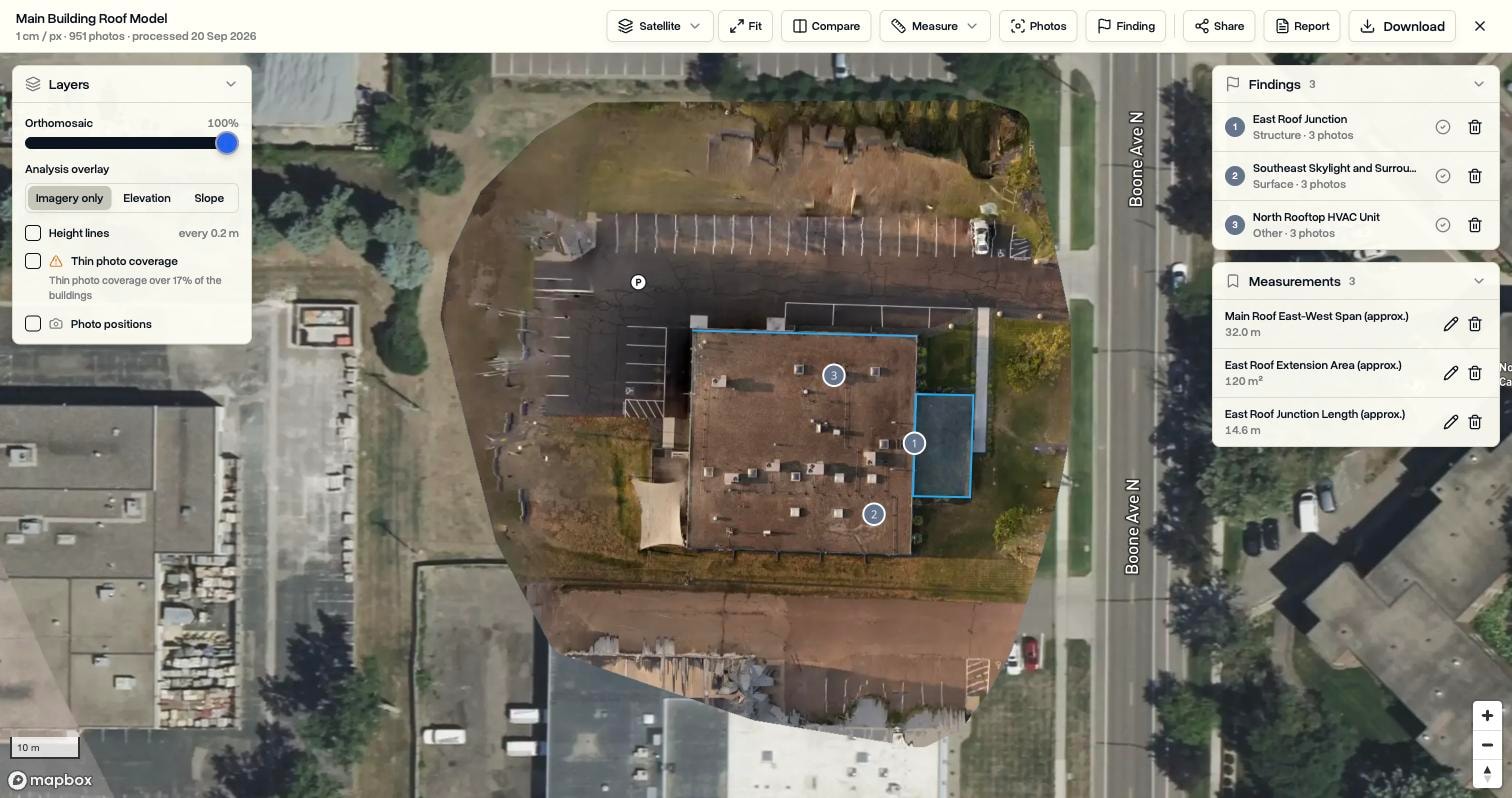
DroneBundle's 3D Scans turn the drone photos on a job into a measurable map, a textured 3D model or a thermal map, then produce a branded PDF roof inspection report from the findings and measurements you save on it. It covers most of the photo-to-report path described above in one place.
How the pieces line up with the template:
- Measurements (section 6). The Roof tool traces a roof face and returns its pitch, the direction it faces, and its true surface area rather than just the footprint. Saved measurements go straight into the report.
- Findings (section 7). Pin a spot or outline an area, set a category and condition rating from your own scale, add notes, a status and an optional repair cost. The original photos that captured that spot are attached automatically, so the overview-context-detail sequence is mostly done for you.
- Scope and evidence (sections 4 and 5). Click any point and see every original photo that captured it. The report can list the photo count and resolution and outline areas with thin photo coverage. Flight logs and pilot assignments live on the same job, so most of the capture record is not reconstructed from memory. The job's weather tab is a forecast, not a record, so log conditions at capture yourself.
- Report and delivery (sections 8 and 9). The report editor adds your overview and recommendations, a condition summary, findings table, a page per finding and saved measurements, with a live preview and your branding. Or share a browser link so the client can explore the scan without signing in.
- Before and after. When a job has more than one scan, Compare puts two of them on one map with a divider you drag, which is the fastest way to show what changed between flights.
3D Scans is included with Enterprise and every 14-day free trial. The full walkthrough is in the 3D Scans launch post, and the operational side of running a roof program is in our roof inspection software guide. For survey and inspection teams more broadly, see the surveying and inspection industry page.
FAQ
What should be included in a roof inspection report?
A roof inspection report should include the property and client details, inspection date and inspector credentials, a description of the roof system, how the roof was inspected, what was not inspected, measurements with their method, individual findings with location, condition, priority and photos, ranked recommendations, and a signed sign-off. Drone reports should also include the pilot, aircraft, weather at capture and a flight log reference.
How long does it take to get a roof inspection report?
Turnaround varies by inspector and job, so ask when you book. On a single residential roof the flight is usually the short part; most of the time goes into reviewing imagery, building measurements and writing findings. Commercial roofs with 3D models or thermal surveys take longer, especially if cores are needed to verify moisture readings.
Is a drone roof inspection report accepted by insurance companies?
It depends on the carrier, so ask before you fly. What makes any report useful to an adjuster is the evidence: clear per-slope documentation, capture date and conditions, the pilot's credentials, and preserved original images. Some damage types, like hail bruising on shingles, may still need hands-on confirmation, so check what the carrier requires.
Who can write a roof inspection report?
Anyone inspecting a roof can document what they saw, but the report is only as credible as its author's qualifications. Roofing contractors, home inspectors, and certified roof inspectors commonly write them. If you fly a drone for the inspection as part of any business, you need a Part 107 certificate in the US, and valuing insurance losses may require an adjuster licence depending on your state.
Turn your next roof flight into a report you can defend
A roof inspection report is only as strong as the path from photo to finding. If your measurements live in one tool, your photos in another and your report in a word processor, every handoff is a chance to lose the evidence that makes the report credible.
DroneBundle keeps the job, the flights, the scan, the findings and the branded report in one place, so the report you send is backed by everything that produced it. Start a free 14-day trial with no credit card and build a report from your next roof flight, or book a live demo to see a roof scan go from upload to client-ready PDF. Plans and scan credits are on the pricing page.